
Space & Installation Guide
Learn how a Ueerl hyperbaric oxygen chamber is brought into your space, assembled, connected, tested and prepared for everyday use.
From the first doorway measurement to the final operator demonstration, this guide explains what to prepare and what happens during installation for homes and commercial wellness spaces.
Confirm room size, delivery access, floor suitability and utility locations before shipment.
Structural work and system connections are checked before concealed areas are closed.
Allow for sealant curing, leak checks, functional testing and operator training.
How much space does a hyperbaric chamber need?
The required space includes more than the chamber footprint. Plan for the door opening, the main unit, equipment ventilation, connection routes and maintenance access. The approved installation drawing for your selected configuration determines the final layout.
Ventilation and connection space
Plan the complete operating area
Measure the room at its narrowest points, including skirting boards, columns, sloping ceilings and any furniture that will remain. Share a simple floor plan with the proposed chamber position and power-supply location.
- Allow the door to open and users to enter and exit comfortably.
- Keep controls and the manual pressure-relief valve accessible.
- Provide the equipment clearance shown on the installation drawing.
- Leave room for installers to align modules and complete connections.
- For commercial spaces, consider staff supervision and customer circulation.
Floor condition & structural support
Choose a stable, level floor suitable for the installed chamber and its operating load. For upper floors, raised floors or uncertain structures, have the building owner or a qualified structural professional confirm suitability using the supplied weight and support information.
Ceiling height & overhead clearance
Check the finished ceiling height and any lights, beams, sprinklers or air-conditioning ducts above the planned position. Allow for assembly and top-panel installation, as well as the clearance specified for future servicing.
Power supply & electrical connections
Confirm voltage, frequency, plug type, earthing and the required circuit capacity against your equipment specification. Arrange any site electrical work before delivery. Do not assume that every chamber configuration uses the same outlet or power rating.
Ventilation & equipment environment
Provide a clean, dry indoor space with room ventilation appropriate to the installation. Keep equipment air inlets, outlets and service panels clear. Confirm air-conditioning pipework and condensate arrangements with Ueerl for your configuration.
Check the entire route into your room
A wide room entrance does not guarantee an easy delivery. Review the route from the unloading point to the final position, including building entrances, lifts, corridors, turns, thresholds and internal doors.
Doors, corridors & turns
Measure the clear opening with the door open, rather than relying on its nominal size. Record opening height, corridor width, tight corners, steps and obstacles along the full delivery route.
Lifts, stairs & unloading
For lift access, provide the door opening, internal cabin dimensions and rated capacity. Identify stairs, loading restrictions and any handling equipment required. Confirm the delivery method before dispatch.
Protect the installation area
Clear furniture and protect finished floors with suitable protective covering. Reserve space to unpack, check components and stage modules without blocking exits or surrounding equipment.

Modular delivery or whole-unit placement?
Where the selected configuration supports modular installation, sections are brought into the room and assembled on site. This can help with restricted access, but each module still needs a confirmed handling route.
Whole-unit placement may be suitable when the delivery route accommodates the assembled equipment. Share doorway measurements and route photos so Ueerl can confirm the appropriate approach.
How is a Ueerl hyperbaric oxygen chamber installed?
Installation progresses from the pressure-bearing structure to system connections, sealing checks and interior finishing. The sequence below explains the shared workflow; individual components and assembly details follow the documentation supplied with your chamber.
- Receiving & positioning
Protect the floor and check the components
The team checks the delivered chamber sections, panels, fittings and accessories against the packing list. Components are positioned in the planned assembly area, with floor protection in place before heavy sections are moved.
- Check for transport damage before assembly.
- Identify the section orientation and connection faces.
- Keep the work area clear and protect visible finishes.
- Structural assembly
Seal, align and secure the chamber sections
The specified sealing material and structural sealant are applied to the mating surfaces. Sections are aligned, initially secured and checked for level before final fastening. Excess material is removed as directed by the installation instructions.
- Use the approved seals, sealant and fasteners.
- Check alignment before completing the joints.
- Follow the specified fastening procedure for the configuration.
- Control system preparation
Install control boards and route the wiring
Control boards and display adapters are fitted in their designated positions. Sensor, lighting, seating and display wiring is routed before interior panels conceal the connection areas. Cable penetrations are sealed where required.
- Keep power disconnected during electrical assembly.
- Follow the supplied wiring diagram and connector labels.
- Protect wiring from sharp edges and moving parts.
- Climate & main-unit connections
Fit the air conditioning and connect the main unit
Where supplied, the indoor air-conditioning unit is mounted and its pipework, power and signal lines are routed through the designated openings. Condensate connections are secured. Pressure-air lines, oxygen lines and system cables are connected to the main unit as specified.
- Seal designated pipe and cable pass-throughs.
- Check hose routing, support and connection security.
- Confirm the condensate path for the supplied system.
- Door, windows & safety controls
Install the door seals and accessible controls
The team fits the door assembly, viewing-window seals, retaining components, outside display, emergency-stop button and manual pressure-relief valve where applicable. Interfaces and mounting penetrations are sealed to maintain the chamber boundary.
- Check seal seating and continuity.
- Check door fit, movement and alignment.
- Keep relief controls and emergency functions accessible.
- First sealing inspection
Allow curing time and verify the chamber seal
Before pressure testing, the installer checks for unsealed openings and completes the required sealant work. Newly sealed joints are allowed to cure under the applicable installation instructions. The team then carries out a controlled leak check and reviews pressure readings.
- Include the specified curing period in the schedule.
- Inspect joints and penetrations for leakage.
- Correct any issue and repeat the check before proceeding.
- Exterior & interior finishing
Fit the trim panels, flooring and lighting
After the initial sealing checks, remaining exterior panels and interior trim are fitted in the required sequence. Flooring, ceiling trims and lighting are installed while preserving the planned wiring and tubing routes. Temporary door removal may be required for interior access.
- Check concealed routing before closing panels.
- Handle trim edges carefully to avoid damage.
- Remove protective films at the appropriate stage.
- Interior equipment
Connect the oxygen terminal, display and seating
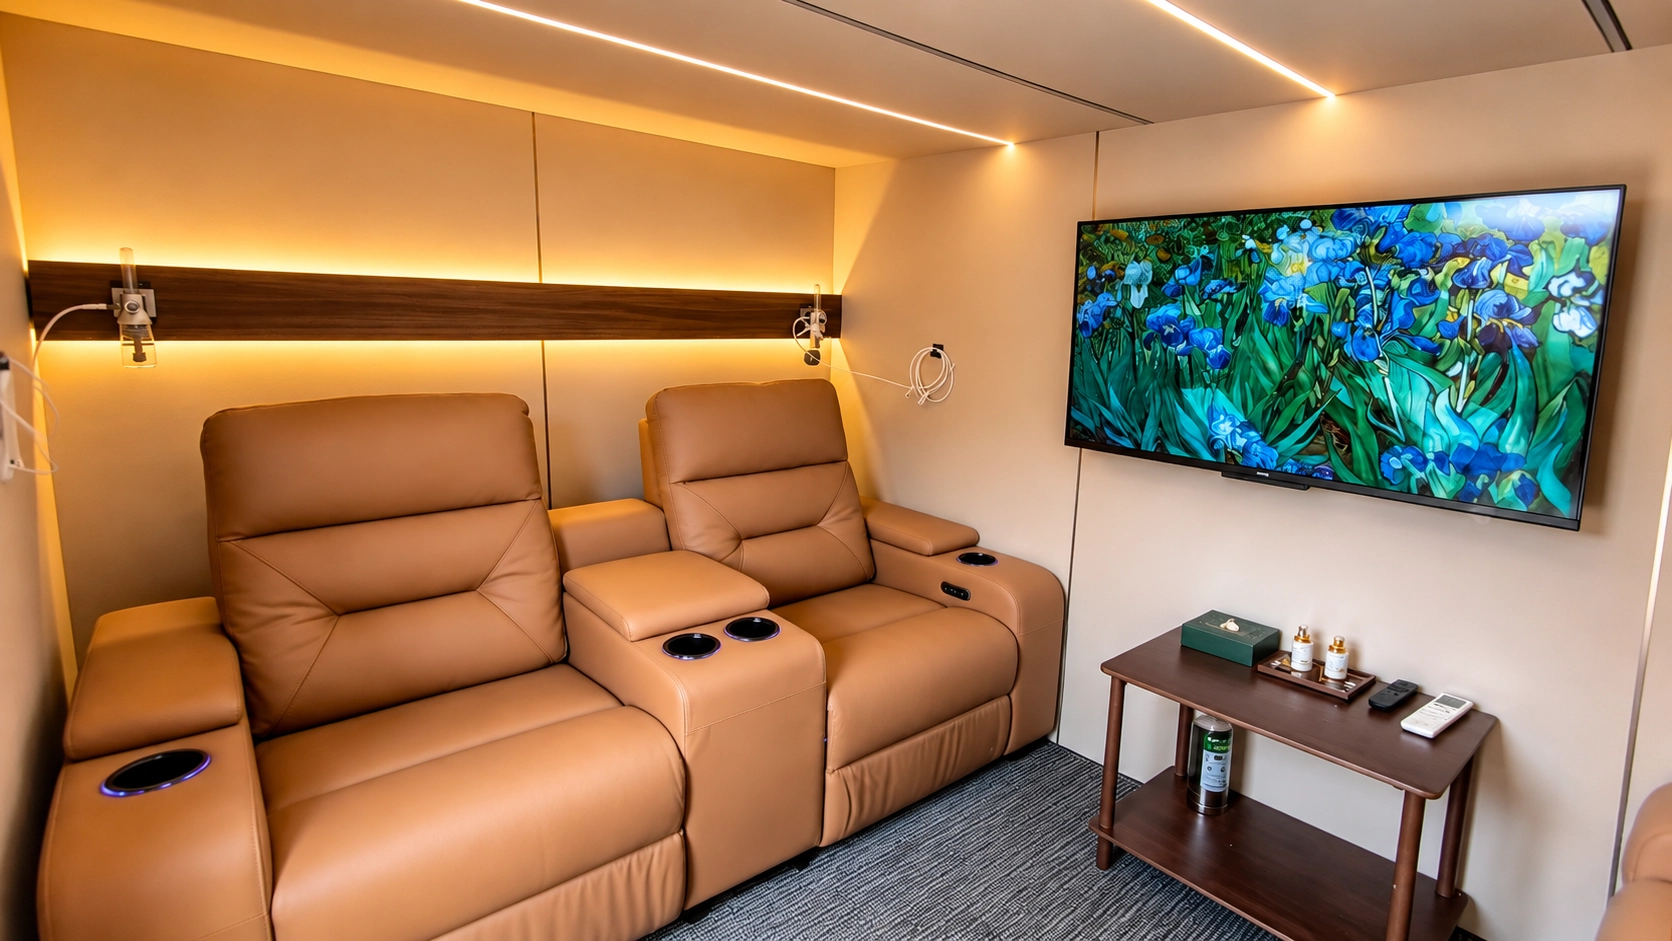
The oxygen terminal assembly and sensors are fitted and connected where supplied. The television, lighting and reclining seating are installed, followed by the final door fitting and supplied accessories. Electrical connections are completed with power disconnected.
- Confirm oxygen tubing and sensor connections.
- Check seating movement and cable clearance.
- Fit supplied signs and accessories in their designated positions.
- Final commissioning
Test the completed system and demonstrate operation
The assembled chamber is cleaned and checked again as a complete system. The installation team verifies the configured controls, pressure functions, communication and comfort equipment before demonstrating operation and confirming readiness for handover.
- Complete final checks after any door refitting.
- Demonstrate the normal entry, session and exit sequence.
- Record any outstanding issue before release for use.
What is checked before the first session?
A successful handover combines equipment verification with practical operator training. The team checks the completed installation against the supplied operating and commissioning instructions.
- Sealing and pressure: joint integrity, stable readings and the specified leak-check acceptance criteria.
- Controls and communication: inside and outside displays, configured controls and two-way communication.
- Safety functions: door operation, emergency-stop function and manual pressure-relief demonstration.
- Oxygen and comfort equipment: fitted oxygen connections and sensors, ventilation, air conditioning, lighting and seating.
- Operator readiness: normal operation, controlled exit, cleaning guidance and support contact details.
Your installation preparation checklist
Use this quick checklist to review your site with Ueerl before arranging delivery. You can tick the items while reading; selections are temporary and are not submitted.
Hyperbaric chamber installation FAQs
Have a specific doorway, room layout or building-access question? Send measurements and photos so we can review your installation requirements.
Ask Ueerl about your space →Can a chamber fit through a standard household doorway?
It depends on the selected chamber, its delivery format and the full access route. Modular delivery may help where the configuration supports it, but the module dimensions, doorway height and corridor turns must still be checked. Send the clear opening measurements to Ueerl before shipment.
How long does installation take?
The schedule depends on the chamber configuration, access conditions, assembly work and testing requirements. Where structural sealant is applied, curing time must be included. Confirm the complete schedule with Ueerl, including commissioning and training.
Can I install the chamber myself?
Owners can prepare the space, access route and utilities. Structural sealing, electrical connections and pressure-system commissioning should be completed by Ueerl engineers or appropriately trained installation personnel using the supplied documentation.
Can a hyperbaric chamber be installed upstairs?
An upstairs installation requires a review of floor suitability, equipment load and delivery access. Provide the chamber weight and support information to the building owner or a qualified structural professional, and confirm lift or stair handling before arranging delivery.
Is the chamber ready to use as soon as assembly finishes?
Use begins after the applicable sealant curing, leak checks, final functional tests and operator handover are complete. Assembly completion alone does not confirm readiness for operation.
What information should I send for an installation review?
Send your country and city, intended use, preferred capacity or configuration, room dimensions, floor level, delivery-route measurements, lift information where relevant, power-supply details and clear photos of the route and proposed position.
Plan your Ueerl chamber installation
Whether you are preparing a home wellness room or a commercial facility, start with the space you have. Share your measurements and project requirements so our team can discuss a suitable chamber configuration, delivery approach and installation plan.
Include these details in your inquiry
- Installation country, city and building floor.
- Home or commercial use and preferred user capacity.
- Room length, width and finished ceiling height.
- Clear doorway sizes, corridor turns and lift information.
- Photos or a floor plan of the proposed installation area.
- Available power supply and preferred delivery timing.